I’m often in other time zones for business or pleasure. It’s convenient to have a clock showing the local time on my Windows 10 Pro based laptop, while at the same time having a separate clock showing the time back home. Adding a second clock Windows 10 is not as intuitive as one would hope. Here’s a brief post on how to do it.
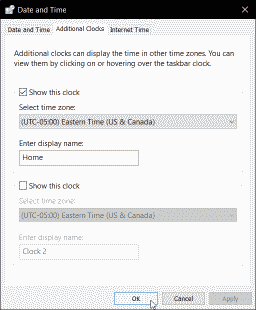
To add additional clock in Windows 10 right-click on the time displayed in the lower left corner of the task bar and select “Adjust date/time”. Now chose “Add clocks for different time zones”. Another window will appear allowing you to change the date and time settings. Select the “Additional Clocks” tab. Check the box next to “Show this clock”, then select a time zone from the drop list. Finally, enter a name that will be displayed adjacent to this additional clock. In this example we’ll use the name “Home”. When complete select “OK” (See Figure 1).
That’s it. Now hover your mouse pointer over the time displayed on the task bar and it will show two clocks: one showing the local time, the other showing the time associated with the time zone and name you’ve chosen.
