(20250610) – The steps described in this post were amended to address changes in recent versions of software — iceflatline)
TeamSpeak is a voice communication tool for online gaming, education and training, internal business communication, and similar use cases. This post will describe how to install TeamSpeak server on the Windows operating system, configure it to listen for incoming voice connections using a non-default UDP port, and test the installation/configuration using the TeamSpeak client application. Also discussed is how to remove your TeamSpeak server from the list of publicly available servers. The versions for the software discussed in this post are as follows:
- Windows 11 Pro x64
- TeamSpeak Server 64-bit 3.13.7
- teamSpeak3 Client 64-bit 3.6.2
Let’s get started…
Install and Configure the TeamSpeak Server
Start by downloading the TeamSpeak server and extracting the folder contained within the zip file to a location of your choice. We’ll use C:\ in our example. After the folder is extracted we should see the folder C:\teamspeak3-server_win64.
Open this folder and create a shortcut to C:\teamspeak3-server_win64\ts3server.exe to somewhere convenient. Right-click on the shortcut, navigate to Properties, and append createinifile=1 to C:\teamspeak3-server_win64\ts3server.exe in the Target field (e.g. C:\teamspeak3-server_win64\ts3server.exe createinifile=1) then select “OK” to save and close the window.
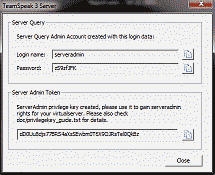
Double-click on this shortcut to start to start the TeamSpeak server, and accept the license agreement. You should now see a new icon in the notification area of the windows task bar indicating that the TeamSpeak server has started. When the TeamSpeak server is started for the first time a pop-up window will appear showing the Server Query Admin credentials and the Server Admin Privilege Key (See Figure 1). You can disregard this information for now and close the window.
Now open the folder C:\teamspeak3-server_win64 and you should see several new files, including ts3server.ini and ts3server.sqlitedb.
Stop the TeamSpeak server by right-clicking on the icon in the notification tray and selecting “Exit”. Delete the file C:\teamspeak3-server_win64\ts3server.sqlitedb. Open C:\teamspeak-3-server\ts3server.ini and change the value of default_voice_port value to the port number desired. We’ll use 12010 in our example.
Once again right-click on the shortcut, navigate to Properties. Replace createinifile=1 with inifile=ts3server.ini in the Target field (e.g., C:\teamspeak3-server_win64\ts3server.exe inifile=ts3server.ini) then select “OK” to save and close the window.
Restart the Teamspeak server using the shortcut and a new C:\teamspeak3-server_win64\ts3server.sqlitedb file will be created containing the new port number. The pop-up window showing the Server Query Admin credentials and the Server Admin Privilege Key will again appear. This time you’ll want to copy at least the Server Admin Privilege Key somewhere as this key is needed to gain administration rights to your TeamSpeak server. I also recommend copying the Server Query Admin credentials somewhere as well. This will be needed should you ever want to use ServerQuery, a command line based administration tool supported by TeamSpeak.
Test Using the TeamSpeak Client
Okay, now that we have the TeamSpeak server installed and configured let’s install the TeamSpeak client and test to ensure that you can connect to it.
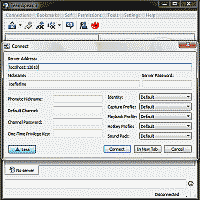
Download the TeamSpeak3 client application and install it. Start the TeamSpeak server and then start the TeamSpeak client. Once the TeamSpeak client has started select Connections->Connect (or use CTRL+s). In the Server Address field enter the host name of the Teamspeak server followed by the port number the server is listening on for incoming voice connections. These two entries should be seperated with a colon. Since our Teamspeak server is located on the same machine as the TeamSpeak client we’ll use the host name localhost. The port number will of course be the one we configured for this Teamspeak server, port 12010 (See Figure 2):
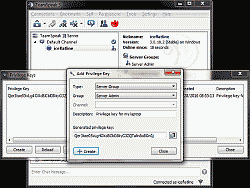
Select “Connect” and you’ll will be connected to your TeamSpeak server. A window will appear indicating that this is newly created Teamspeak server and that the administrative privileges have not yet been claimed. Enter your Server Admin Privilege Key, then select OK. Note that this pop-up window will occur each time you connect to the TeamSpeak server until you’ve used the Server Admin Privilege Key. An unused Server Admin Privilege Key can be entered at any time after you’ve connected to the TeamSpeak Server by selecting Permissions->Use Public Key.
Now that you’ve verified that you can connect to your TeamSpeak server locally, make sure to forward the correct UDP port (12010 in our example) in your NAT gateway so that, if desired, TeamSpeak clients outside of your local network can connect to your Teamspeak server.
Prevent your TeamSpeak server from appearing in the public server list
TeamSpeak servers are automatically added to a list of publicly available servers when installed. This may not be desirable. To remove your server from this public server list connect to your server using a TeamSpeak client with administrative privileges. Right-click on your server’s name and select Edit Virtual Server. Select the Misc tab, then the More drop-down list, and uncheck the option “Enable reporting to server list” then select “Apply” (See Figure 3).
Conclusion
Well there you have it. A post describing how to install TeamSpeak server on the Windows operating system. The developers of TeamSpeak should make it easier for server administrators to make simple modifications like changing the default ports. Until they do this article should help you make those changes.


Super helpful. Thank you! A third edit of the server shortcut should be mentioned to remove the “inifile=ts3server.ini” flag from Target.
Thanks, Trey. Glad it was helpful. Actually, it does no harm to leave “inifile=ts3server.ini” in the Target field, but I agree it should be removed, just to keep the configuration tidy.