bookmark_borderHow to Securely Login to Your WordPress Web Site Using SSH Port Forwarding

This post describes how to securely login to your web site using an SSH (“Secure Shell”) tunnel created using dynamic SSH port forwarding. You will need to have access to an SSH connection to your web hosting account. Most web hosts should be able to provide you with one. While this post uses a WordPress-based web site as an example, the techniques described should be able to be applied to any web site so long as the web host permits SSH connections.

Introduction

A SSH tunnel consists of an encrypted data path created through a SSH protocol connection. A SSH tunnel can be used to transfer unencrypted traffic over an IP network, such as the public Internet, through an encrypted channel. Why use an SSH tunnel to login into your WordPress web site? In brief, better security. Unless you already have SSL configured on the server and have WordPress correctly configured to force SSL logins, your login name and password are passed in the clear each time you login to administer the site. Dynamic SSH port forwarding transforms the SSH client on a local machine into a SOCKS proxy server. Any traffic sent to the proxy will be sent to the SSH server, which will forward that traffic as its own firewall and routing rules permit. We can use this capability to our advantage to forward login credentials over the SSH connection to WordPress more securely.

To set up an SSH tunnel using dynamic SSH port forwarding, a port number is chosen for use as the SOCKS server port. Whenever a connection is made to this port, all traffic is forwarded to the SSH server, and the application protocol is then used to determine where to connect to from the SSH server. In our case that protocol is HTTP and our web browser must be configured specifically to use the proxy server (and must reconfigured when you stop using the proxy server). For purposes of example, we’ll use the standards SOCKS port 1080 (technically, you can use any port number, however be aware that some programs will only work if you use 1080), and Firefox as the web browser, and we’ll assume that the web host’s SSH server is listening for incoming connections on the SSH default port 22.

Dynamic Port Forwarding On Linux/Unix

Creating a SSH tunnel using dynamic port forwarding on a Linux/Unix system is quite easy. Simply start a termnal session and enter the following command:

The -D option specifies a local “dynamic” application-level port forwarding and the port parameter is the port chosen for the proxy server to listen on. The user@hostname parameter is the remote SSH server and associated account where you will forward your connection. In our case user will typically be your web host account user name and hostname will typically be your web site’s domain name. For example:

If your web host’s SSH server is listening for connections a port other than 22 then you can specify the correct port in the command using the -p option, for example:

If this is the first time you’ve attempted to connect to your web host provider using SSH, you’ll likely receive a warning concerning the authenticity of the host you’re trying to reach along with a fingerprint of its public key and asked if you’re sure you want to continue connecting. If you’re absolutely sure that you’re indeed connecting to your host provider, accept by entering Yes. You’re then typically requested to enter your account password and the connection will proceed. The command prompt should be returned to you without error indicating that tunnel was established successfully.

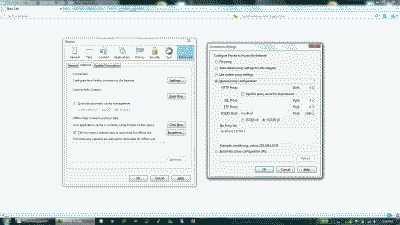
Now open Firefox and navigate to Tools->Options->Advanced->Network and select “Settings” (Note: in some implementations of Firefox, particularly on Linux, network connection settings are found under Edit->Preferences->Advanced->Network). Select “Manual proxy configuration” and enter localhost in the “SOCKS Host:” field and 1080 in the associated “Port” field, then select “OK” and once again in the Options menu to close it out. (See Figure 1).

Screenshot of the Firefox network settings with manual proxy configuration

Figure 1

Now simply point your browser to your WordPress login URL – usually your-web-site-url/wp-admin or your-web-site-url/wp-login.php – where you can login securely over your newly created SSH tunnel to administer the site. Note that you must maintain the SSH connection in order to maintain your connection to the web site. When finished using the tunnel, simply exit the terminal session that is maintaining the SSH connection and return Firefox to its default “no proxy’ settings.

Dynamic Port Forwarding On Windows

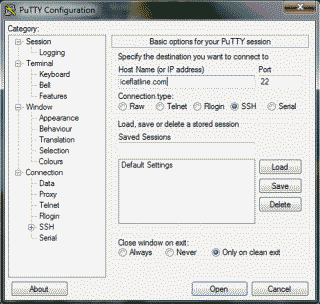
Creating an SSH tunnel using dynamic port forwarding on a Windows system is also easy; however, we’ll first need to download and install an SSH application (Windows doesn’t support SSH natively). There are several out there to choose from, but the one I typically use is PuTTY, a free implementation of Telnet and SSH for Win32 and Linux/Unix platforms. Download PuTTY.exe (or the Installer version if you’d prefer) and run it. Enter your web site domain name in the “Host Name (or IP address)” field. If your web host’s SSH server is listening for connections a port other than 22 then modify the “port” field to reflect the correct port number (See Figure 2).

Screenshot of the PuTTY application

Figure 2

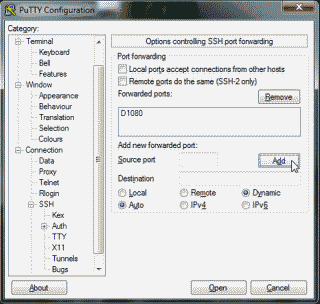
Next, under the “Category” column on the left side of the application, navigate to Connection->SSH->Tunnels. Enter 1080 in the “Source port” field and select the “Dynamic” radio button, then select “Add” (See Figure 3).

Screenshot of where to create a dynamic SSH tunnel in the PuTTY application

Figure 3

Now select “Open” to initiate the connection. If this is the first time you’ve attempted to connect to your web host provider using SSH, you’ll likely receive a popup from the PuTTY application with a warning concerning the authenticity of the host you’re trying to reach along with a fingerprint of its public key. If you’re absolutely sure that you are indeed connecting to your host provider, select “Yes” to add the public key to PuTTY’s cache and carry on connecting. Alternatively, if want to connect just once, without adding the key to the cache, select “No”. You’re then typically requested to enter your account password and the connection will proceed. The command prompt should be returned to you without error indicating that tunnel was established successfully.

Now open Firefox and configure the settings as described above in the Linux section. When complete, point your browser to your WordPress login URL where you can login securely over your newly created SSH tunnel to administer the site. Note that you must maintain the SSH connection (i.e., the PuTTY window must remain open) in order to maintain your connection to the web site. When finished using the tunnel, simply exit the terminal session that PuTTY created for the SSH connection and return Firefox to its default no proxy settings.

Conclusion
Well, there you have it. Would obtaining an SSL certificate be simplier? Perhaps. But until you do here’s a way to login more securely to your WordPress web site using an SSH tunnel created using dynamic SSH port forwarding.

References

Lucas, M. SSH Mastery. USA: Tilted Windmill Press, 2012. Print.
bookmark_borderHow to Install Apache, MySQL, PHP, and phpMyAdmin on FreeBSD

(20170107 — The steps in this post were amended to address changes in recent versions of software. Minor editorial corrections were also made — iceflatline)

This post will describe how to install and configure Apache, MySQL, PHP and phpMyAdmin on FreeBSD for basic local web development. Once set up, you’ll be able to use your “FAMP” server to do web development, code testing, maintain local copies of your web sites, etc.

The software discussed in this post are available as free and open source under various licensing structures. The versions of software discussed in this post are as follows:

  • FreeBSD 11.0-RELEASE
  • apache24-2.4.25_1
  • mysql57-server-5.7.17
  • mod_php70-7.0.14
  • php70-7.0.14
  • php70-extensions-1.1
  • phpMyAdmin-4.6.5.2
  • WordPress 4.7

The following steps discussed in this post assume you have the FreeBSD Ports Collection installed. If not, you can install it using the following commands:

If the Ports Collection is already installed, make sure to update it:

Okay, let’s get started. All commands are issued as the user root. While building the various ports you should accept all default configuration options unless otherwise instructed.

Install Apache

Navigate to the Apache server port and build it:

Once Apache has been successfully installed, use the sysrc command to add the following line to /etc/rc.conf so that the Apache server will start automatically at system boot.

Now let’s start Apache to make sure it works:

Point your web browser to the host name or IP address of the FreeBSD host you’ve installed Apache on and you should see the venerable “It works!”

Install MySQL

Navigate to the MySQL server port and build it:

Add the following line to /etc/rc.conf using sysrc:

And start the mysql server:

Then set a password for the MySQL root user:

You’ll be requested to enter a password. Enter the random initial root password contained in /root/.mysql_secret. You’ll now be at the command prompt for the mysql server. Change your root password using the following command:

Enter ‘quit’ to exit the server. You may now delete /root/.mysql_secret.

Install PHP

Next, we’ll build PHP:

Then add the extensions to PHP to round out its capabilities. Before we build this port though we’ll want to add support for MySQLi (an improved interface to MySQL) in order to communicate with the MySQL server.

In the corresponding menu you should select “MYSQLI”, then proceed with building the port:

Now let’s add the module required to support PHP applications on Apache:

Install phpMyAdmin

phpMyAdmin is a free software tool written in PHP intended to handle the administration of MySQL from your web browser. phpMyAdmin supports a wide range of operations with MySQL, including managing databases, tables, fields, relations, indexes, users, permissions, etc., from an easy-to-use web page, while you still have the ability to directly execute any SQL statement from the command line if you prefer. Installing phpMyAdmin is optional but it’s a nice tool to have:

Configuration

Now that we have the requisite ports built and installed it’s time to configure them. First, let’s create the file /usr/local/etc/php.ini to hold our PHP options. The simpliest way to do this is to copy the file /usr/local/etc/php.ini-development which will add the default settings for new PHP installations. This configuration is suitable for development purposes, but NOT necessarily for production purposes. If your plans include a production server, then among other things, and before going online with your site, you should consider copying /usr/local/etc/php.ini-production instead and consult the recommendations at http://php.net/manual/en/security.php.

Now let’s configure Apache. Open the file /usr/local/etc/apache24/httpd.conf and look for the following line:

And change it so it reads as follows:

Then append the following lines to the end of the file in order to support PHP files as well as phpMyAdmin, which normally lives outside of the Apache document root. Note: if you elected not to install phpMyAdmin, then you need only add the FilesMatch directives.

Now restart Apache:

That’s it for our Apache configuration. Now let’s configure phpMyAdmin. We’ll do this by creating the file /usr/local/www/phpMyAdmin/config.inc.php, the basic configuration file for phpMyAdmin. Traditionally, users have manually created or modified /usr/local/www/phpMyAdmin/config.inc.php, but now phpMyAdmin includes a nice setup script, making it much easier to create this file with the settings you want. Start by creating the directory /usr/local/www/phpMyAdmin/config and make it writable by the phpMyAdmin setup script:

Then make /usr/local/www/phpMyAdmin/config.inc.php readable by the phpMyAdmin setup script:

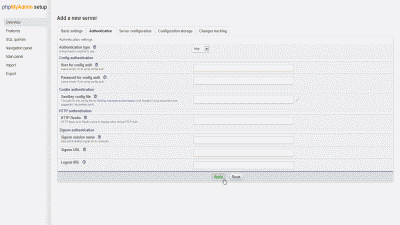
Now open your web browser and navigate to http://your-hostname-or-IP-address/phpmyadmin/setup where you will see the phpMyAdmin setup Overview page. Select “New server” and then select the “Authentication” tab. Under the “Authentication type” choose “http” from the drop-down list (using HTTP-Auth to sign-in into phpMyAdmin will avoid storing login/password credentials directly in config.inc.php) and remove “root” from the “User for config auth”(See Figure 1).

Screenshot of the phpMyAdmin setup page

Figure 1

Now select “Apply” and you will be returned you to the Overview page where you should see a new server listed. Select “Save” in the Overview page to save your configuration as /usr/local/www/phpMyAdmin/config/config.inc.php. Now let’s move that file up one directory to /usr/local/www/phpMyAdmin where phpMyAdmin can make use of it.

Now let’s try out phpMyAdmin to make sure it works. Point your web browser to http://your-hostname-or-IP-address/phpmyadmin where you will be presented with a pop-up box requesting you to log in. Use “root” and the MySQL password you set up previously, then you should be directed to the phpMyAdmin administration page. We no longer need the /usr/local/www/phpMyAdmin/config directory so let’s remove it, as well as the read permission we added previously to /usr/local/www/phpMyAdmin/config.inc.php:

And wrap up by restarting the Apache and MySQL servers:

Testing our installation using WordPress

WordPress is a full-featured website/blog platform that makes heavy use of Apache, MySQL and PHP. We’ll install it on our newly created implementation to ensure we have these packages installed and working correctly. Once again, all commands are issued as the root user or by simulating the root user using the command su. Let’s start by downloading the latest WordPress directly from the developers site to your home directory and untarring the package:

You should now see the new directory wordpress in your home directory. Next we need to create the file ~/wordpress/wp-config.php and make some changes to it so WordPress can access the MySQL server. First, let’s copy the file ~/wordpress/wp-config-sample.php to use as a template:

Open ~/wordpress/wp-config.php in your favorite editor and enter the database name as well as your MySQL login and password in the appropriate lines. When complete, it should look like the following:

Now move the wordpress directory to Apache’s document root:

Next, let’s create an MySQL database for our WordPress installation. Open phpMyAdmin in your browser and create a database by selecting the “Databases” tab at the top. Enter a name for it in the “Create database” field. For purposes of our example, I’ll use “wordpress” as the database name. You’re free to use a different database name, just make sure to use the same name in the define(‘DB_NAME’, ‘your-DB-name’); line in ~/wordpress/wp-config.php as described above. Then select “Create.”

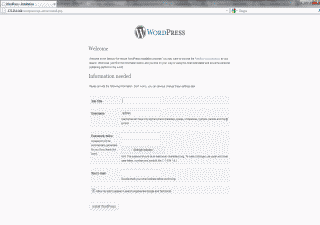
Now let’s run the WordPress script that will populate its database with the requisite tables. Open your web browser and navigate to http://your-hostname-or-IP-address/wordpress/wp-admin/install.php. If everything is configured correctly you should see the WordPress installation wizard page (See Figure 2). Enter a title for your site, username, password, and an e-mail, then select “Install WordPress.” Then login with your newly created WordPress credentials and you should be presented with the default WordPress administration page.

Screenshot of WordPress installation page

Figure 2

Common problems

An error that occasionally pops up when attempting to start the Apache server is the following:

This can be fixed by adding the following line to /usr/local/etc/apache24/httpd.conf:

HTTP 403 permission problems when trying to access phpMyAdmin is another area that seems to sometimes trip people up. This is usually caused by errors in the way either the Alias or Directory Apache directives for phpMyAdmin have been written in /usr/local/etc/apache24/httpd.conf. As an example, a missing “/” in the Alias statement cost me two hours of troubleshooting time!

Conclusion

Well, that’s it. A few hours of your time with the FreeBSD Ports Collection and you can a get a fully configured “FAMP” web development server up and running on your FreeBSD box.

References

http://caffetine.org/freebsd-amp.php

https://httpd.apache.org/docs/2.4/upgrading.html

http://dev.mysql.com/doc/refman/5.7/en/

bookmark_borderHow to Fix Duplicate Title and Meta Tags When Spanning Multiple Home Pages in WordPress

This post describes how to fix duplicate meta and title tag content when spanning multiple home pages in WordPress. This isn’t a topic I normally cover here at www.iceflatline.com, but after searching for a solution to this problem for this site and continually encountering advice such as just add a plugin, I decided to post how I fixed this problem without encumbering my site with yet another WordPress plugin or other solutions.

The Problem

Like each post here at iceflatline.com, my index or main “home” page contains its own unique description and keywords meta tags and title tag content. WordPress allows me to determine the number of posts displayed on my home page (I typically choose five). Once this limit is reached, my WordPress theme automatically generates an “Older Entries” link at the bottom of the page, allowing the reader to navigate to a another page containing the previous five posts, and so on. While this is a helpful navigation feature for the reader, to a search engine like Google it’s another URL that contains the same meta and title tag content as that of the main home page. For example, I use the following content for my home page description and keywords meta tags:

Left unchanged, however, each Older Entries link will also contain the same description and keywords content. Consequently, tools like Google’s Webmaster Tools will complain that it has detected duplicate meta descriptions. This issue likely won’t prevent your site from appearing in search results, but paying attention to it can provide Google and other search engines with more information and help drive traffic to your site.

The Solution

To fix the problem of duplicate meta and title content I added a bit of PHP code to my theme’s header.php file. When a reader of iceflatline.com uses the Older Entries link to view a page containing its previous five posts, this code will automatically prepend or append a page number to the contents of these tags so that the metadata in each of these pages appears unique to the search engine. The page numbering starts with 2 and increments each time the reader navigates to a previous page.

    Duplicate Meta Tag Content

To eliminate duplicate description and keywords meta tag content, I added the following PHP code to my theme’s header.php file:

Now when someone clicks on Older Entries the description and keywords meta tag content will be prepended with a page number so that it looks like this:

If desired, the following variations of the code above will append the page numbers instead:

    Duplicate Title Tag Content

To eliminate duplicate title tag content, I appended the following PHP code to the tag’s existing contents in my theme’s header.php file:

Combined with the original code, the revised PHP code within the title tags now looks like this:

Now when someone clicks on Older Entries the title description will be appended with a page number so that it looks like this:

Conclusion
There ya have it. A bit PHP code and I fixed these nagging problems, and saved myself the hassle of having to update and manage yet another WordPress plugin or use some other solution that didn’t fully meet my needs.

iceflatline