bookmark_borderInstall and Use tmux in FreeBSD

I’ve recently (re)discovered how beneficial tmux is when managing my small FreeBSD-based home server (running FreeBSD 14.0-RELEASE-p5 at time of this post). According to the FreeBSD man pages, tmux is a terminal multiplexer that it enables a number of terminals to be created, accessed, and controlled from a single screen. tmux may be detached from a screen and continue in the background, then later reattached.

My FreeBSD servers run headless so I typically administer them from the command line via SSH connections. Thanks to tmux, I can have one or more terminal sessions operating simultaneously over a single SSH connection. But what I appreciate even more is that should my connection to a server fail for any reason, my terminal session will be maintained by tmux, allowing me to pick right back up where I left off when the SSH connection can be reestablished.

I’m using FreeBSD binary packages instead of ports these days so to install tmux (version 3.3a_1 at the time of this post) I first update the package repository on the system then install tmux as the user root:

Once installed I logged into my system through SSH and start tmux:

Optionally I can name my session by passing the parameter -s [your-session-name] to tmux when I start it. For example:

When tmux is started it creates new terminal session within a single window. A green status line appears at the bottom of the screen. This is used to show information about the session as well as for entering commands. Now that I’m connected to tmux, I can run any commands or programs I normally would.

Let’s test to make sure tmux is working as as it should by running the the table of processes or “top” command to display information on your system’s CPU(s) and running processes.

Now that top is running, I can detach from tmux using the command Ctrl+b followed by d, leaving top running in active in memory. Now I’ll end my SSH session and reconnect. In order to get back to my running instance of top I need only reattach to tmux.

And I now see top running just as I had left it. You can see the value of tmux in this example. If I were to lose SSH connection to a server for whatever reason, any work I was doing would still be running under tmux when I reestablish my connection.

I can also run two or more terminal sessions simultaneously in tmux. To do this I create a new window using the command Ctrl+b followed by c. Each of these windows is assigned an index number (e.g., 0,1,.. ) and those are shown in the green status line. I can now navigate between these windows using Ctrl+b followed by the number assigned to them , or by using Ctrl+b followed by n (next) or p (previous).

Another handy command is Ctrl+b followed by w, which opens a panel allowing me to chose a window interactively.

Here is a list of the keybindings I find useful. You can view a list of all of the keybindings that tmux offers by using the command Ctrl+b followed by ? or by consulting the tmux man pages.

Ctrl+b ?   View all keybindings. Press q to exit.
Ctrl+b d   Detach from the current session.
Ctrl+b c   Create a new window.
Ctrl+b x   Close window.
Ctrl+b n or p   Move to the next or previous window.
Ctrl+b 0 (1,2…)   Move to a specific window by number.
Ctrl+b w   Open a panel to navigate across windows in multiple sessions.

Conclusion

I’ve really enjoyed getting back into using tmux. It’s made managing my servers more productive as well giving me piece of mind knowing that I can safely return to what I was doing should I lose my SSH connection.

References
https://man.freebsd.org/cgi/man.cgi?query=tmux
https://github.com/tmux/tmux/wiki
bookmark_borderThe FreeBSD top command

Hey, howdy. Yeah, I know, it’s been awhile.

Here’s a very short post on the FreeBSD top command, mostly because I was using it the other day and it was um…, top of mind (sorry).

The table of processes or “top” command can be used to display information on your FreeBSD system’s CPU(s) and running processes. By default top lists the processes based on their CPU usage, and will update the list every second. Here are a few of the top options I find handy:

-h   Summarizes the options available for top

-a   Displays the command name and its full path, rather than just its executable name.

-H   Display each thread for a multi-threaded process individually. By default a single summary line is displayed for each process.

-I   Toggles the display of idle processes. By default, top displays both active and idle processes.

-m   Display statistics based on either I/O or CPU usage. The default is CPU.

-S   Display system processes. Normally, system processes such as pagedaemon and clock are not shown.

References

https://man.freebsd.org/cgi/man.cgi?top(1)
https://klarasystems.com/articles/explaining-top1-on-freebsd/

bookmark_borderA Simple Script for Creating and Deleting Rolling ZFS Snapshots in FreeBSD

Here’s a simple little Bourne shell-compatible script I wrote to create and delete rolling ZFS snapshots on a small home server running the FreeBSD operating system. Sure there’s ports/packages available in FreeBSD to accomplish this, but there’s something to be said for keeping it simple and having one less piece of software to update and maintain.

As currently configured, the script recursively creates a daily snapshot of /pool_0/dataset_0. The name of each snapshot consists of the word “snap,” followed by the date and time the snapshot was taken (e.g., snap-202002102300). Snapshots are retained in pool_0/dataset_0/.zfs/snapshots. The script will then destroy any snapshot older that 90 days and log what its done to the file cronlog located in my home directory. A typical ~/cronlog entry looks like the following:

Using the script

To use the script, I save it as zfssnap.sh in ~/bin, where I keep most of my helper scripts, and make it executable:

Then I delegate some ZFS permissions to user iceflatline so snapshots can be created and destroyed without becoming the root user. However, this command is issued as the user root:

Note that I’ve set permissions at the zpool level, which means that all datasets under pool_0 will inherit these settings. Alternatively I could have applied the permissions just to dataset_0.

Then I make the snapshots retained in pool_0/dataset_0/.zfs/snapshots. Here too, the command must be issued as the user root:

Here again, I’ve applied applied this setting at the zpool level so when additional datasets are created in pool_0 they will inherit this setting. And here too, I could have applied this setting just to dataset_0.

Finally I configure a cronjob in the crontab for user iceflatline so that the script runs daily at 23:00:

If you’d like to use the script as is then simply modify the variable src_0 to reflect the name of your zpool and dataset. Else, modify the script to suite your needs.

Prefer to run the script more frequently than daily? Modify your cronjob. Here are couple of examples for running the script more frequently:

Don’t like the snapshot naming convention. No problem, just modify the variable snap_prefix.

Prefer to have more or less than 90 snapshots? Modify the retention variable.

Want to add other zpools and/or datasets? Add them to another variable (e.g., src_1), then modify the remainder of the script to recognize and take action on them.

Prefer to have the script log its output to a different location? Modify the log variable.

You get the idea.

Conclusion

There you have it. A simple way to create and destroy ZFS snapshots on a rolling basis under FreeBSD.

bookmark_borderInstall and Configure Folding@home on Ubuntu Server

Folding@home is a distributed computing project started by Stanford University to help understand protein folding, misfolding, and related diseases. The project uses the idle processing resources of thousands of personal computers belonging to people that have installed the Folding@home software on their systems. In this post I will describe how to install and configure the Folding@home client software on Ubuntu server. All steps assume that the Apache http server on Ubuntu server is installed and operating correctly.

Software versions used in this post were as follows:

  • Ubuntu server 16.04.3 LTS
  • fahclient_7.4.4_amd64.deb

So let’s get started…

Download and Install

First, update your package list:

Then download and install the latest 64-bit version of the Debian-based Folding@home client to a location of your choice. In this example we’ll use the user’s home directory:

Note that fahclient_7.4.4_amd64.deb was the most current version of the client at the time this post was published. You may need to update the file name in this command in order to fetch the most recent version of the software.

Now lets install the client:

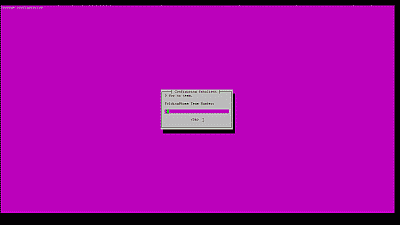
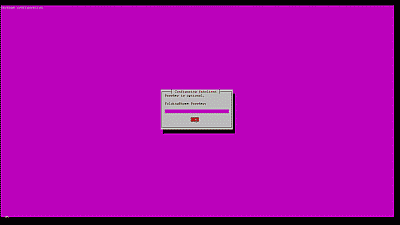
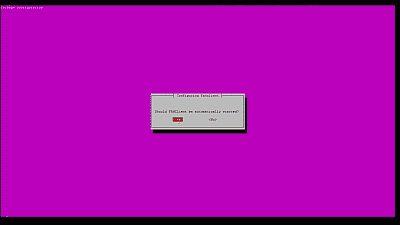
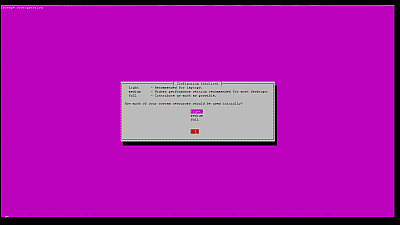
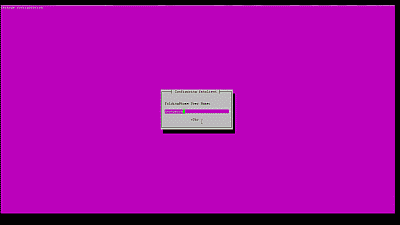
The installer will request you to enter a Folding@home donor name, team number, passkey (optional), whether the client should be automatically started at system boot, and how much of your system resources should be used (See Figures 1-5, repectively).

If you have an existing Folding@home donor name enter that name here, else enter a new donor name:

Screenshot showing the install message regarding the folding at home user name

Figure 1

If you’re joining an existing Folding@home team, enter that team number here, else simply enter 0 for no team:

Screenshot showing the install message regarding the folding at home team number

Figure 2

The Folding@home passkey is a unique identifier that ties your Folding@home contributions directly to you (not just those with your username). The passkey uniquely identifies you as an individual donor and is associated with the results that you have completed. If you have an Folding@home passkey and would like to use it enter it here. If you don’t have a passkey and would like one, you can request one from Folding@home. Else simply select “Ok” here to move to the next screen:

Screenshot showing the install message regarding the folding at home passkey

Figure 3

Choose whether or not you want the Folding@home client to startup automatically when the Ubuntu server boots:

Screenshot showing the install message regarding the folding at home start up

Figure 4

Finally, you can select how aggressively the client uses your system’s CPU resources:

Screenshot showing the install message regarding the folding at home resource use

Figure 5

The installer will finish and automatically start the Folding@home client. You can verify that the client is running using the following command:

You can now delete the installation Folding@home package fahclient_7.4.4_amd64.deb from your home directory, if desired.

Configure

Now that the Folding@home client has been installed it’s time to configure Web Control, Folding@home’s graphical interface. Web Control is the default control program for monitoring your Folding@home client via an easy to use web page.

First, stop your running Folding@home client:

Then use sudo and your favorite editor to append the following lines to /etc/fahclient/config.xml, which will grant access to the Web Control dashboard to a specific IP address. Unfortunately Web Control can only grant access to a single IP address. In this example we’ve chosen to grant access to the host with the IP address 192.168.10.100:

Finally, restart the Folding@home client:

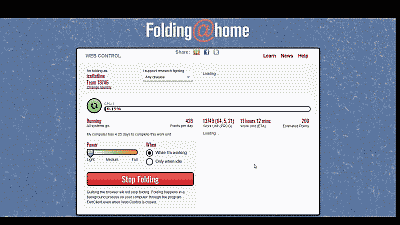
You should now be able to access the Folding@home Web Control dash board at http://your-ubuntu-server-IP-address:7396/ (See Figure 6)

Screenshot showing the folding at home Web Control dashboard

Figure 6

Conclusion
There you have it. A few minutes of your time and you can easily have Folding@home up and running on your Ubuntu server. I think Folding@Home is a great cause and have created my own Folding@Home team to contribute some of my spare CPU cycles. How about you? If you have a few cycles to spare how about dedicating some to Folding@home’s efforts? You’re also welcome to join join my team. To join, simply enter the team number 78746 when you install folding@home.

References
https://en.wikipedia.org/wiki/Folding@home
https://foldingathome.org/support/

bookmark_borderSo Long CrunchBang, And Thanks For All The Fish

They say nothing lasts forever, and sadly that statement seems to have been proven true again. Yesterday, Philip Newborough (aka corenominal) announced that he would no longer be developing CrunchBang Linux.

In his post, Philip stated that he felt that it “…no longer holds any value…,” and that “… it would be in the best interest of its users, who would benefit from using vanilla Debian.” I couldn’t disagree more Philip. For those of us who were trying to escape the trappings of increasingly bloated distributions like Ubuntu, Fedora, Mint, and their ilk, CrunchBang, with its light-weight Openbox window manager, was an asylum. A minimalist distribution; designed to be efficient and customizable, CrunchBang struck the right balance between speed and functionality. I still think there is a demand for such a distribution.

I can’t tell you how profoundly sad I am about this news. I of course wish Philip the very best in whatever the future may bring. He should be very proud of his creation, and he should know that CrunchBang Linux will always hold a special place in my heart.

iceflatline